
A desk companion you can build.
A pocket-sized touch display with a face, a clock, weather and world time. The firmware, the printable case and the simulator on this page are free for everyone.
The real printable case, rendered live. The screen is the firmware running in your browser. Drag to turn it.
10
pages, swipe to change
6
themes
37
world-clock cities
1.47"
touch display
Ten pages, one swipe apart.
The first five rotate on their own. Focus, Power, Settings, Setup and About open when you swipe to them.
The pages
Face
A small character that looks around, blinks and reacts when you touch it.
Try itClock
Large time with seconds, 12 or 24 hour. Dims after 15 minutes.
Try itDate
Day, date and month at a glance.
Try itWeather
Current conditions for your city in three layouts: banner, split or card.
Try itWorld
Three more cities beside your own, with daylight saving handled for you.
Try itFocus
A timer ring. While it runs, the device stays on this page.
Try itPower
Clock, Saver or Active. Long-press 1.5 s to switch.
Try itSettings
Theme, face, layouts, clock format and page dots, all by touch.
Try it
This is the real firmware, running here.
The simulator is the same C++ that goes on the chip, compiled to WebAssembly. Touch it, change the settings, power-cycle it. Your choices are kept in this browser, like flash on the device.
TinyBuddy simulator
Tap the screen. Swipe to change page, tap for the page action, hold 1.5 s for power mode.
Settings, as on the device
These write the same preferences the Settings page and the phone page write, then power-cycle the real firmware.
World clocks (3 cities)
Weather in the browser uses sample readings so it works offline. On a real device it comes from your own Wi-Fi.
Loading the simulator.
Set it up from your phone.
No app and no cable. The device serves its own setup page. This is that page, running here with sample data. The live preview you see here is a demo drawing; on the device it shows the real screen.
The phone setup page
1.Open the Setup page on the device
On first boot the screen shows the Wi-Fi name TinyBuddy-Setup and its password.
2.Join it from your phone
The setup sheet opens by itself on Android and iPhone. Or open tinybuddy.local.
3.Pick your Wi-Fi, then make it yours
Choose your network and save. Then open tinybuddy.local, enter the PIN and set the look, time, city, photos and TF card.
You are on the TinyBuddy-Setup Wi-Fi.
Two parts. Nothing to glue.
The body holds the display module, the lid holds the battery. The 3D model at the top of the page is this exact case. Here is what is inside it.
Case details
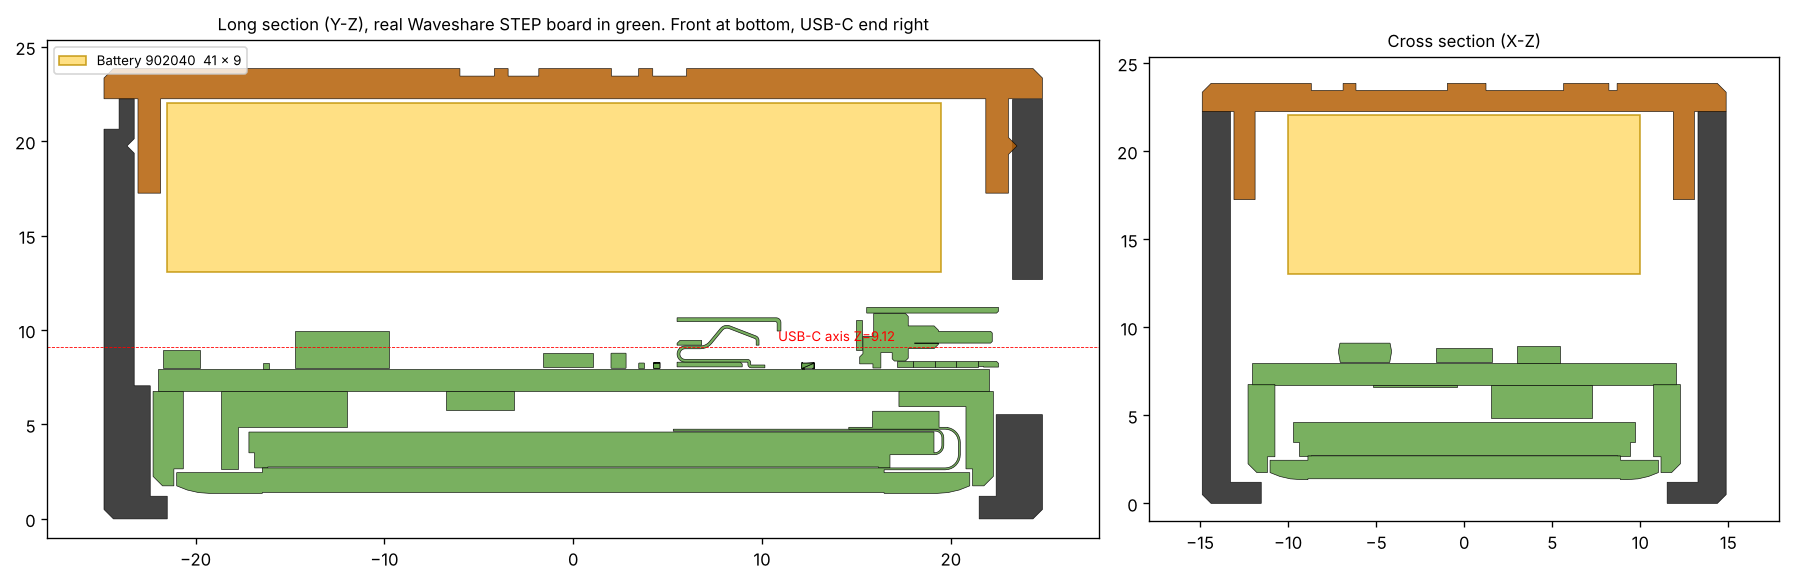
- Board
- Waveshare ESP32-C6-Touch-LCD-1.47
- Display
- 1.47 in, 320 × 172, capacitive touch
- Battery
- 902040 LiPo, 750 mAh (20 × 41 × 9 mm)
- Case
- 29.75 × 49.7 × 23.85 mm, two printed parts
- PETG or PLA+, 0.2 mm layers, 3 walls, no supports
- Body
- Printed front face down
- Lid
- Printed outer face down, snaps on with detents
- Firmware
- Arduino IDE 2.x, esp32 core 3.x, GFX Library for Arduino, ArduinoJson 7
Five steps, one weekend.
How to build it
0 of 5 done
Print the test frame first
It has the same geometry as the final body. Check the board, battery and USB-C opening before you print the real parts.
Print the body and lid
Body front face down, lid outer face down. No supports.
Flash the firmware
Open TinyBuddy.ino in Arduino IDE 2.x. Pick ESP32C6 Dev Module, enable USB CDC On Boot, then upload.
Set up Wi-Fi
On first boot the Setup page shows the password for the Wi-Fi network TinyBuddy-Setup. Join it from your phone and enter your own Wi-Fi.
Assemble
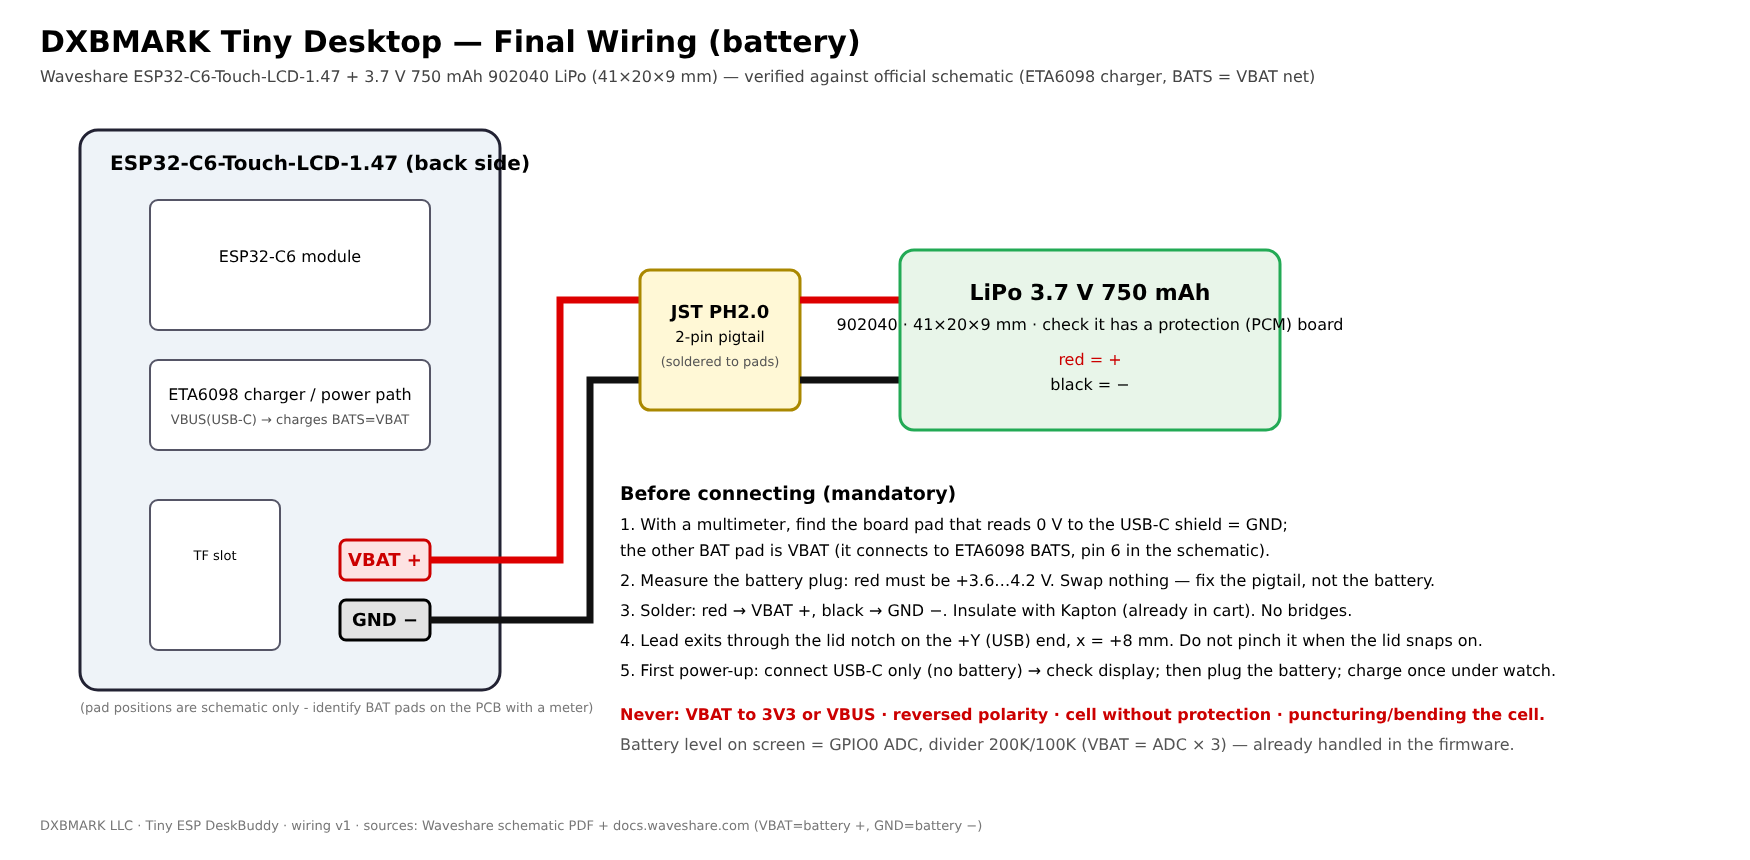
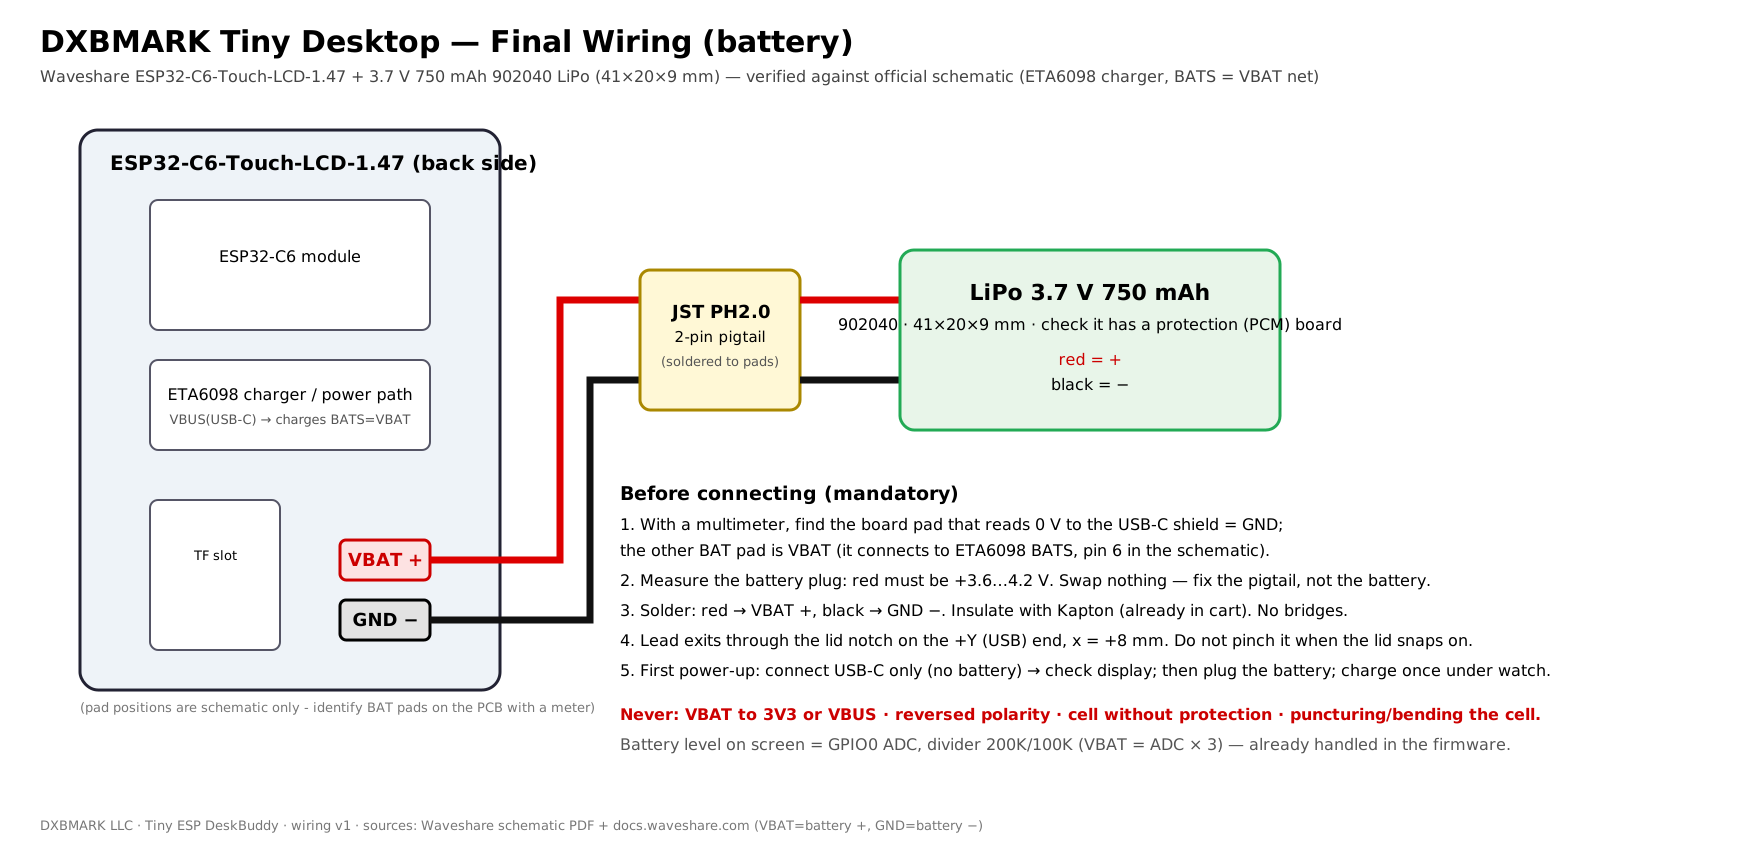
Board into the body, foam and battery behind it, then close the lid. Check the battery polarity against the Waveshare diagram before you connect it.
Before connecting the battery
- With a multimeter, find the board pad that reads 0 V to the USB-C shield: that is GND. The other battery pad is VBAT.
- Measure the battery plug: red must read +3.6 to 4.2 V. Swap nothing. Fix the pigtail, not the battery.
- Solder red to VBAT (+) and black to GND (−). Insulate with Kapton tape. No bridges.
- The lead exits through the lid notch at the USB end. Do not pinch it when the lid snaps on.
- First power-up: connect USB-C only, no battery, and check the display. Then plug in the battery and charge once while you watch.
Never connect VBAT to 3V3 or VBUS, reverse the polarity, use a cell without protection, or puncture or bend the cell.
Checked
- The simulator runs the firmware's own C++ logic, compiled to WebAssembly: all ten pages, themes, weather layouts, world clocks, timers and power modes.
- Case geometry is checked against the Waveshare STEP model: zero interference for body and lid, battery clearance, USB-C opening centred.
Still open
- The firmware has not been compiled on a real ESP32-C6 yet. Compile it once in Arduino IDE and tell us what you see.
- The case has not been test-printed yet. Print the test frame first.
- The battery pad position on the board is not confirmed. Check the polarity before connecting.
Two parts to buy. The rest is optional.
You need the board and the battery. The extras make the build neater and are all small.
Parts and where to buy them
 Needed
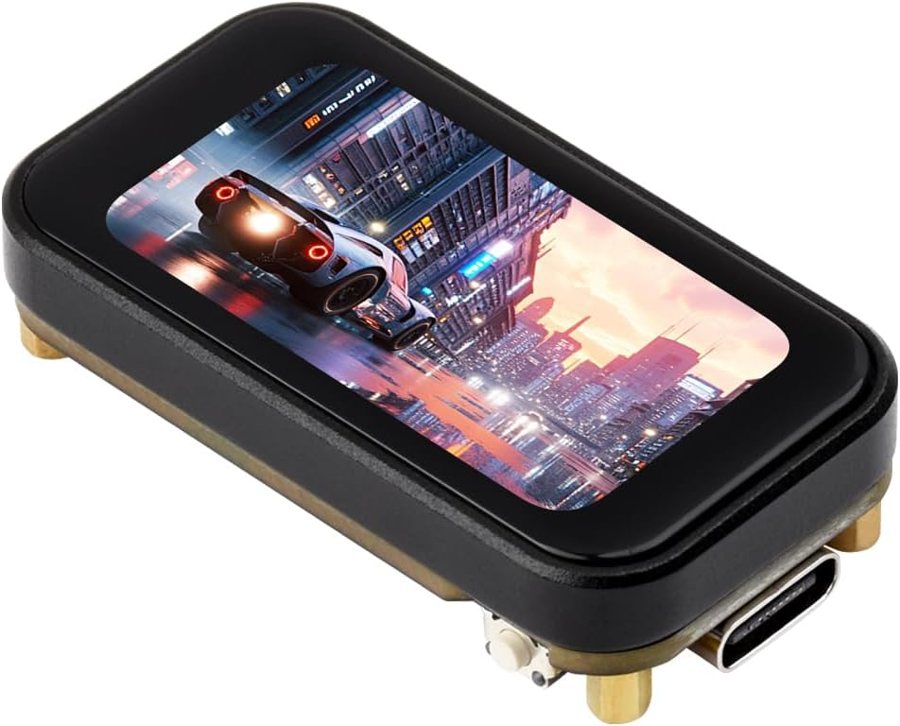
ESP32-C6 1.47 in touch display board
172 × 320, 262K colour LCD, capacitive touch
The brain and the screen. The case is cut for this board.
 Needed
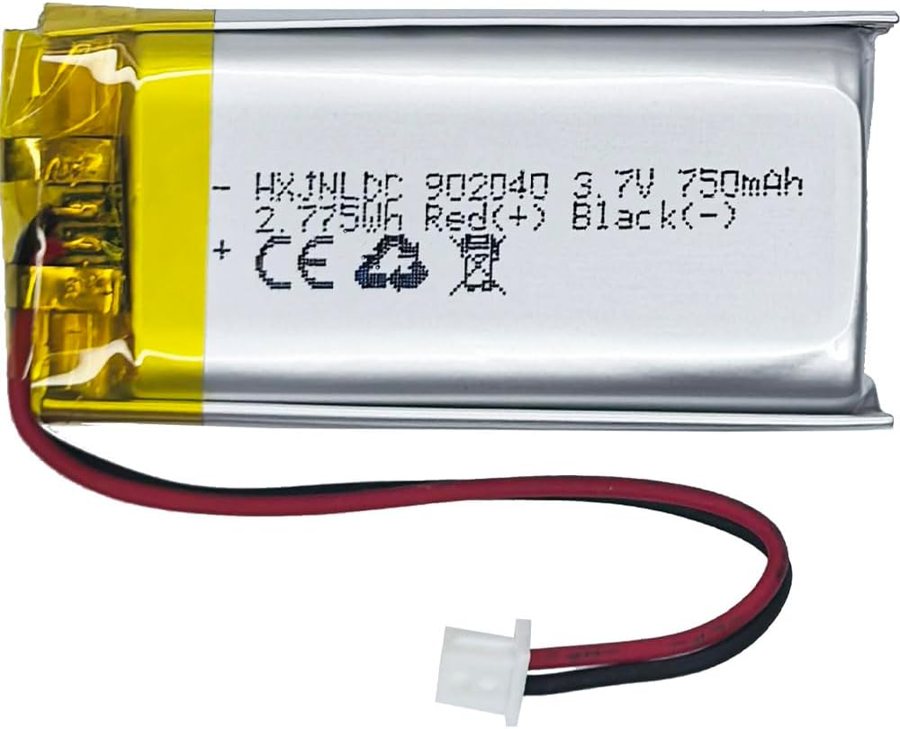
DC 3.7 V 750 mAh 902040 LiPo battery
20 × 41 × 9 mm, rechargeable
Fits the pocket behind the board. Check polarity before connecting.
Optional extras
JST 1.25 mm 2-pin angle connectors with 100 mm wire
For a removable battery lead when your cell and board plugs do not match. Check the plug type and polarity first.
Clear self-adhesive silicone pads
Four are needed. The lid has four recesses sized for 8 mm pads.
These are affiliate links. As an Amazon Associate, DXBMARK earns from qualifying purchases, at no extra cost to you. Check the exact product, size and plug type before you buy.
Take the whole thing. It is free.
Design and code, free to use, change and share. Keep the credit to DXBMARK. Every version is published as a release on GitHub.
Releases
@dxbmark/tinybuddy · firmware v1.2
TinyBuddy open kit v1.2.0
- Firmware: TinyBuddy.ino, logo and the Wi-Fi secrets example
- Case: body and lid as STL and STEP
- Case source: the parametric Python (build123d) script
- Test frame and USB-C coupon for checking fit
- Licences and changelog
Code under the MIT licence. Case and design files under CC BY 4.0.
Questions, answered.
Is the simulator real?
It runs the same C++ as the device, compiled to WebAssembly. Only the hardware is emulated: the screen, touch, Wi-Fi replies and flash storage. Weather in the browser uses sample readings so it works offline.
Can I use and change it?
Yes. The firmware is free to use, change and share under the MIT licence. The case and the other design files are free under CC BY 4.0: keep the credit to DXBMARK.
Do I need to solder?
The battery connects to the board's battery pads. We have not confirmed the pad position yet, so check the Waveshare diagram and the polarity before you connect anything.
Which printer settings?
PETG or PLA+, 0.2 mm layers, 3 walls, 100% perimeters, no supports. Compensate 0.1 mm of elephant foot.
Does it need Wi-Fi?
The clock, face, focus timer and settings work without it. Weather and automatic time zone use your Wi-Fi.
Can I sell it?
The code, the case files and their changes come from DXBMARK LLC and are open source: MIT for the code, CC BY 4.0 for the design files. You may use, change and share them, including commercially, with credit as the licence requires. The DXBMARK name and logo may not be used in any commercial product, its name, packaging or marketing. The Waveshare board and its name belong to Waveshare. TinyBuddy is independent and not affiliated with them.
TinyBuddy is an independent DXBMARK LLC project. Waveshare and its product names belong to their owners and are used only to describe compatibility. Questions or builds to share: [email protected].